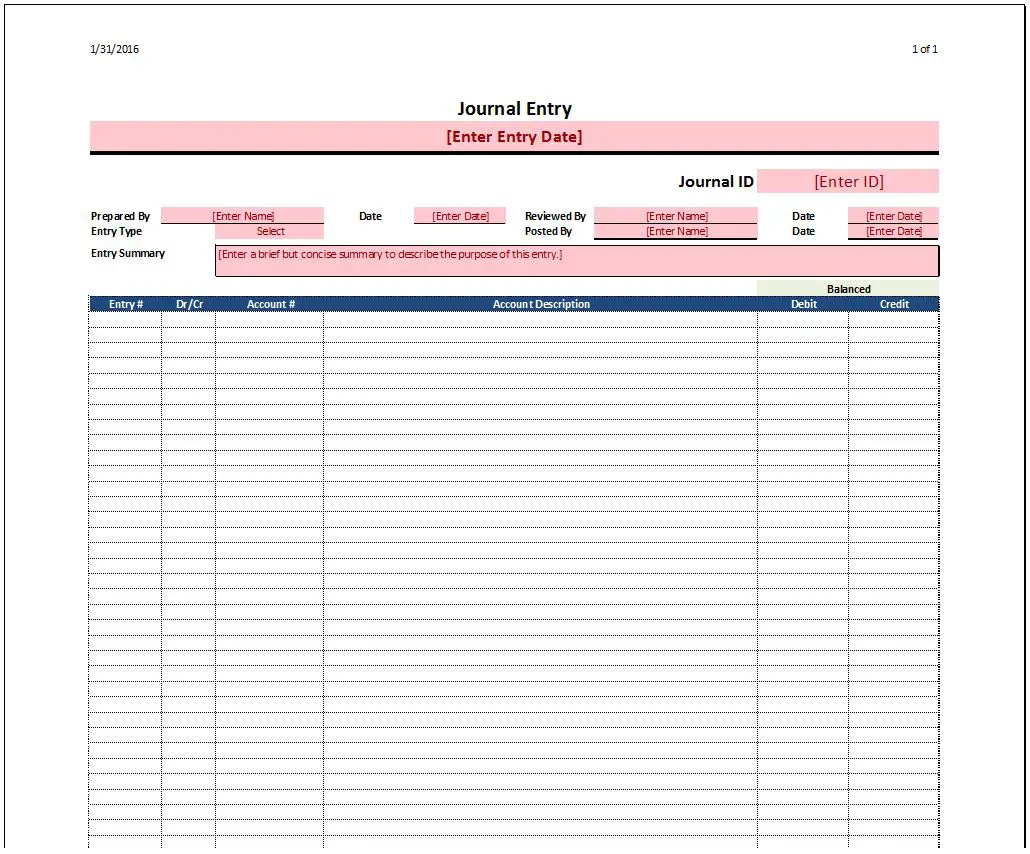
Journal Entry Template
This Journal Entry Template has been designed to go along with this Balance Sheet Reconciliation, Bank Reconciliation and the Month-End Close Checklist. Using a template will help keep the journal entry process efficient. From origination to posting, a common template makes the process faster. This template helps ensure all appropriate information has been included and that the debits and credits balance.
Manual entries are prone to errors. Reduce these errors and improve controls by keeping appropriate segregation of duties.
Journal Entry Template
System Requirements & Download
Cost: Free
System Requirements: Microsoft Excel® 2003 or later
User Agreement: Read it Here
Creator: SpreadsheetShoppe.com
Journal Entry Template Download
Download 29.99 KB 11745 downloads

We’ve kept this template simple and to the point. Enter all of the data at the top of the template, the red color will go away after you’ve entered the information. Just delete what’s there and replace it with the information applicable to the entry. Here are the general fields we’ve included:
- Entry Date – This is the date/period the entry relates to
- Journal Id – Enter the unique identifier for the entry
- Prepared by – Who prepared the entry and the date it was prepared
- Reviewed by – Who reviewed the entry and the date it was reviewed
- Posted by – Who posted the entry and the date it was posted
- Entry Type – One Time, Reversing, Reoccurring, or Error Correction
- Entry Summary – Describe what the entry is accomplishing
Below these fields is the actual journal entry template. We’ve kept the columns fairly standard, but you can adjust these to suit your needs. Currently, the following columns are included:
- Entry # – This can be used if there are more than one journal entries being posted on the same form. Note, this should be rare as multiple journal entries should generally not be posted on the same form. Each should be separately documented and supported. This column could also be used as a Reference # to tie back to support.
- Dr/Cr – Select from the drop down list either Dr (for debit) or Cr for Credit.
- Account # – Enter the account number to be adjusted.
- Account Description – This is the name of the account. We’ve left this column large so it could be used to include other information applicable to your entry. To do this, first click on the column header “Account Description” then select ‘Merge & Center’ from the Home Ribbon. This will unmerge these cells. Now, you can enter the column names associated with the information you want (e.g. business unit, segment, sub-account, etc).
- Debit & Credit – The last two columns are for the amounts. Enter both as positive amounts. Each column sums at the bottom. Right above the Debit and Credit columns is a balance checker. If the debits and credits agree, it will be green and say “Balanced” if they do not balance it will turn red and say “Out of Balance”


